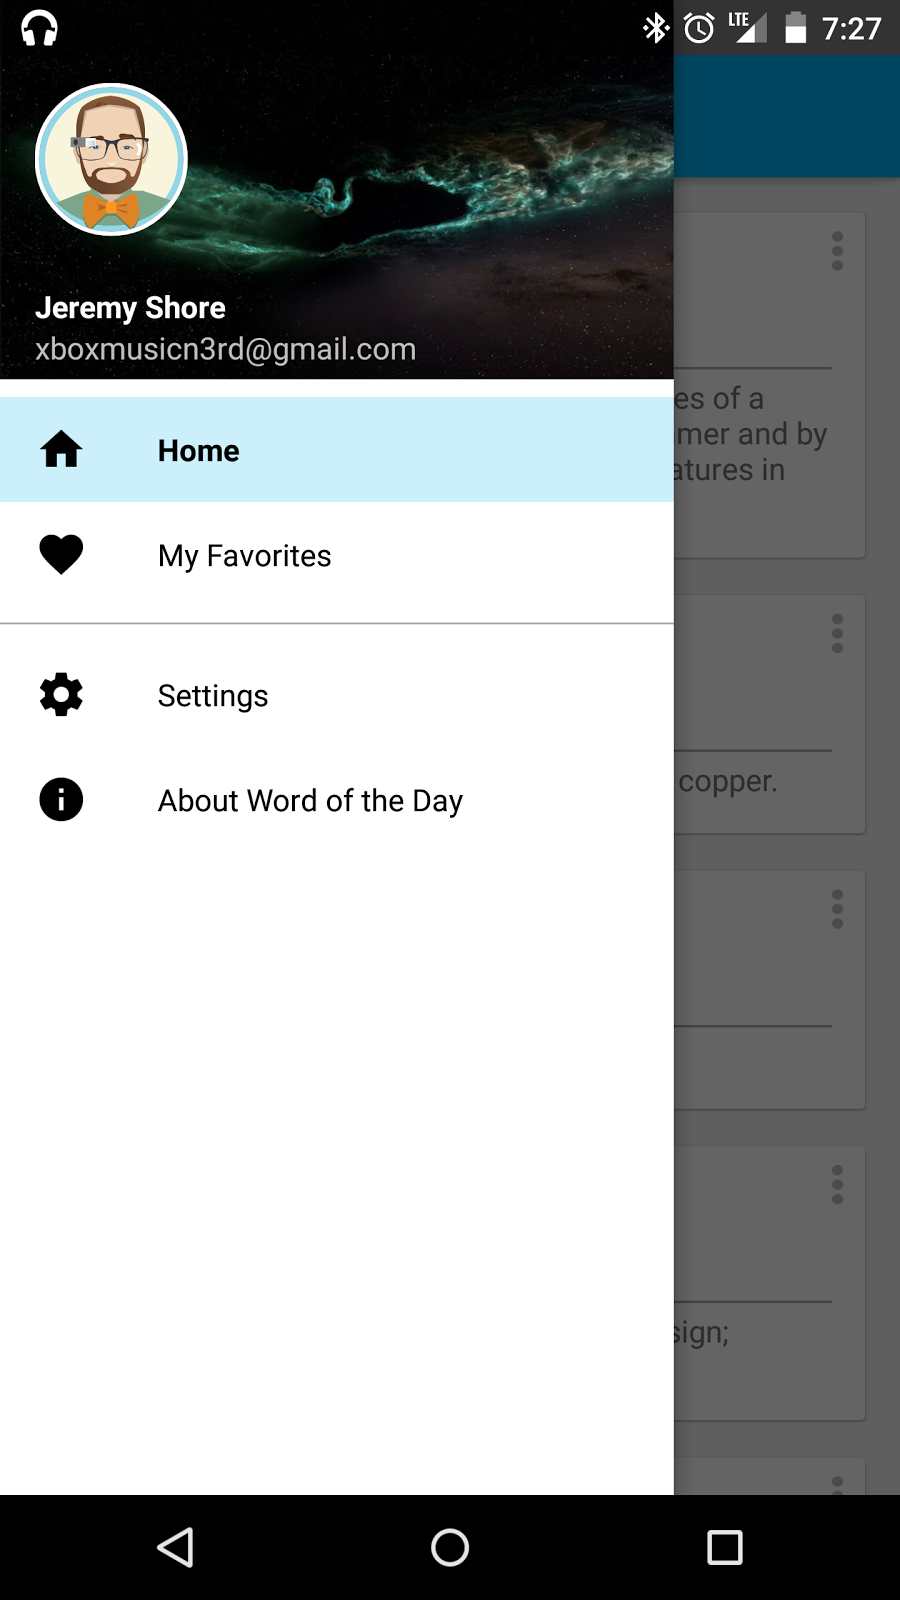
Overview
Today I’m going to go over how to replicate the header you find at the top of the Google app drawers. If you haven’t already, you can check out the previous walkthrough on how to set up your drawer in the first place. It can be found here: Create Material Design Navigation Drawer
Dependencies
First thing you are going to need is to set up a layout that will be the header for the drawer. I personally use Piccaso to load the images. You can either use a custom transform to change the user image to a circle or you can use a circle image view. I chose the circle image view since it makes the default image circle as well. For both of these add these two dependencies to your application build.gradle:
compile 'com.squareup.picasso:picasso:+'
compile 'de.hdodenhof:circleimageview:+'
The ‘+’ are where the version numbers go. You can leave it this way but android studio will throw a warning about them.
Layout Creation
Now I use the same layout for both 21 and previous so mine looks like this:
<RelativeLayout
    xmlns:android="http://schemas.android.com/apk/res/android"
    xmlns:app="http://schemas.android.com/apk/res-auto"
    android:layout_width="match_parent"
    android:layout_height="178dp">

    <ImageView
        android:id="@+id/banner_image"
        android:layout_width="match_parent"
        android:layout_height="match_parent"
        android:adjustViewBounds="true"
        android:background="@android:color/darker_gray"
        android:src="@drawable/bg_default_profile_art"/>

    <de.hdodenhof.circleimageview.CircleImageView
        android:id="@+id/user_image"
        android:layout_width="70dp"
        android:layout_height="70dp"
        android:layout_marginTop="38dp"
        android:layout_marginStart="16dp"
        app:border_width="2dp"
        app:border_color="#ffffff"
        android:src="@drawable/ic_profile_none"/>

    <RelativeLayout
        android:layout_alignBottom="@+id/banner_image"
        android:layout_width="match_parent"
        android:layout_height="48dp">

        <RelativeLayout
            android:layout_marginStart="16dp"
            android:layout_width="wrap_content"
            android:layout_height="wrap_content"
            android:layout_centerVertical="true">

            <TextView
                android:id="@+id/user_name"
                android:layout_width="wrap_content"
                android:layout_height="wrap_content"
                android:textColor="@android:color/primary_text_dark"
                android:textSize="14sp"
                android:textStyle="bold"/>

            <TextView
                android:id="@+id/user_account"
                android:layout_below="@id/user_name"
                android:textColor="@android:color/secondary_text_dark"
                android:layout_width="wrap_content"
                android:layout_height="wrap_content"
                android:textStyle="normal"
                android:textSize="14sp"/>

        </RelativeLayout>

    </RelativeLayout>

</RelativeLayout>
Insert Header into Drawer
The header then needs to be added into your drawer inside of your activity. This needs to be done BEFORE you attach an adapter to your listview.
Go to your activity with the drawer and find the onCreate method. I would recommend to make a private member variable for your header since we will be populating it after you have finished logging into the Google Account. We will then find and set the header for the drawer. (Now remember some of this code you probably recognize from the previous walkthrough so make sure it is in this order)
Once you add in you default profile picture, default banner picture, and an adapter (adapter must be set for the header to become visible) you can run this and you should see your header. Now all we have to do is hook up your Google account to it.
Populating Drawer with user’s Google Account
Now for the fun part. In your main activity where your drawer is going to be we need to set up a log in for the Google Api Client. On connection we will then pull the current person’s name, email, banner image, and profile image. What we need to do is set up some implementations for the callbacks (failed and success) and a couple more override classes. Eventually your main activity should look something like this:
public class MainActivity extends AppCompatActivity implements GoogleApiClient.ConnectionCallbacks, GoogleApiClient.OnConnectionFailedListener {
    private ActionBarDrawerToggle mDrawerToggle;
    private DrawerLayout mDrawerLayout;
    private ListView mDrawerList;
    private FragmentManager mFragmentManager;
    private View mHeaderView;

    private static final int REQUEST_RESOLVE_ERROR = 1001;

    private GoogleApiClient mGoogleApiClient;
    private boolean mResolvingError = false;

    @Override
    protected void onCreate(Bundle savedInstanceState) {
        super.onCreate(savedInstanceState);
        setContentView(R.layout.activity_main);

        Toolbar toolbar = (Toolbar) findViewById(R.id.main_toolbar);
        setSupportActionBar(toolbar);

        mHeaderView = getLayoutInflater().inflate(R.layout.user_header_layout, null);
        mFragmentManager = getSupportFragmentManager();

        mGoogleApiClient = buildGoogleApiClient();
        mGoogleApiClient.connect();

        mDrawerList = (ListView) findViewById(R.id.drawer_listview);
        mDrawerLayout = (DrawerLayout) findViewById(R.id.drawer_layout);
        mDrawerToggle = new ActionBarDrawerToggle(this, mDrawerLayout, toolbar,
                R.string.open, R.string.close);
        mDrawerToggle.setDrawerIndicatorEnabled(true);
        mDrawerLayout.setDrawerListener(mDrawerToggle);
        mDrawerList.addHeaderView(mHeaderView);

        // set adapter
        // set onitemclicklistener

    }

    //item click listener

    public GoogleApiClient buildGoogleApiClient() {
        return new GoogleApiClient.Builder(this)
                .addConnectionCallbacks(this)
                .addOnConnectionFailedListener(this)
                .addApi(Plus.API)
                .addScope(Plus.SCOPE_PLUS_LOGIN)
                .build();
    }

    @Override
    protected void onPostCreate(Bundle savedInstanceState) {
        super.onPostCreate(savedInstanceState);
        mDrawerToggle.syncState();
    }

    @Override
    public void onConfigurationChanged(Configuration newConfig) {
        super.onConfigurationChanged(newConfig);
        mDrawerToggle.onConfigurationChanged(newConfig);
    }

    @Override
    public void onBackPressed() {
        if(mDrawerLayout.isDrawerOpen(Gravity.START|Gravity.LEFT)){
            mDrawerLayout.closeDrawers();
            return;
        }

        super.onBackPressed();
    }

    @Override
    public void onConnectionFailed(ConnectionResult result) {
        if (mResolvingError) {
            // Already attempting to resolve an error.
            return;
        } else if (result.hasResolution()) {
            try {
                mResolvingError = true;
                // start and activity to try and fix the login error
                result.startResolutionForResult(this, REQUEST_RESOLVE_ERROR);
            } catch (IntentSender.SendIntentException e) {
                // try logging in again
                mGoogleApiClient.connect();
            }
        } else {
            mResolvingError = true;
        }
    }

    @Override
    protected void onActivityResult(int requestCode, int resultCode, Intent data) {
        // response from the activity launched by login to get user input
        // to successfully log in
        if (requestCode == REQUEST_RESOLVE_ERROR) {
            mResolvingError = false;
            if (resultCode == RESULT_OK) {
                if (!mGoogleApiClient.isConnecting() && !mGoogleApiClient.isConnected()) {
                    mGoogleApiClient.connect();
                }
            }
        }

        super.onActivityResult(requestCode, resultCode, data);
    }

    @Override
    public void onConnectionSuspended(int cause) {
        mGoogleApiClient.connect();
    }

    @Override
    public void onConnected(Bundle bundle) {
        // get current users account
        Person user = Plus.PeopleApi.getCurrentPerson(mGoogleApiClient);
        if (user != null) {
            // if the user has a profile image
            if (user.getImage().hasUrl()) {
                String portrait = user.getImage().getUrl();
                //load into the portrait imageview
                Picasso.with(this)
                        //remove parameters since the image url makes the image really small
                        .load(portrait.split("\\?")[0])
                        .into((ImageView) mHeaderView.findViewById(R.id.user_image));
            }

            // load the banner into the background
            Picasso.with(this)
                    .load(user.getCover().getCoverPhoto().getUrl())
                    .into((ImageView) mHeaderView.findViewById(R.id.banner_image));

            // set the account name
            ((TextView) findViewById(R.id.user_account))
                    .setText(Plus.AccountApi.getAccountName(mGoogleApiClient));

            // set the user's name
            Person.Name userName = user.getName();
            ((TextView) findViewById(R.id.user_name))
                    .setText(String.format("%s %s", userName.getGivenName(), userName.getFamilyName()));
        }
    }

    @Override
    protected void onStart() {
        super.onStart();
    }

    @Override
    protected void onStop() {
        super.onStop();
        if (mGoogleApiClient.isConnected()) {
            mGoogleApiClient.disconnect();
        }
    }
}
Success
Now you should be able to run and see your new drawer header! Personal note I tend to like to make this the main activity and have fragments and controllers for navigation throughout everything so you only have to worry about logging in once and the drawer is always there (but that is just me).
Once you have an adapter added to this, your drawer should look something like this:

